
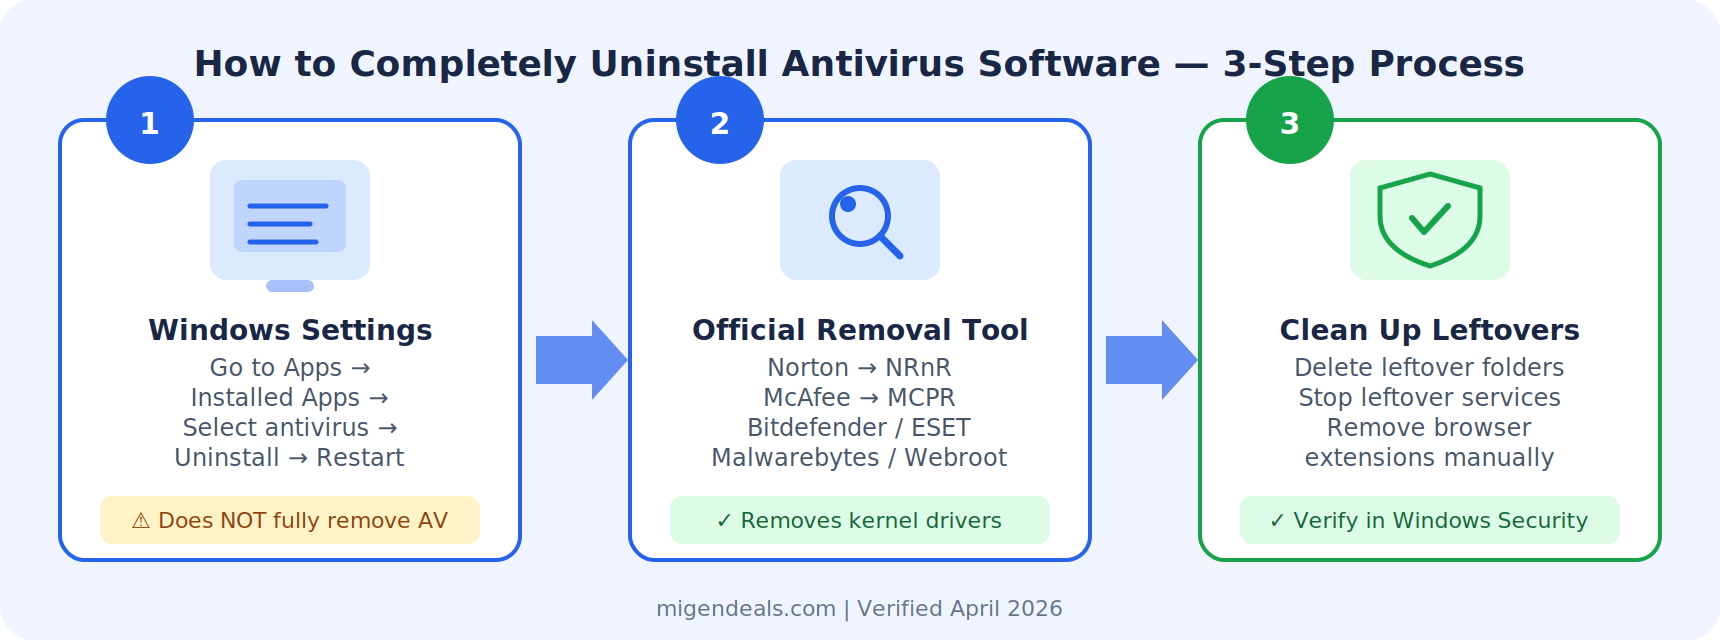
To completely uninstall antivirus software, use a three-step process: remove the program through Windows Settings, run your brand’s official removal tool, then clear leftover files and browser extensions. Standard Windows uninstall leaves behind kernel drivers and system services. Norton uses NRnR, McAfee uses MCPR, Bitdefender and ESET have dedicated uninstallers, and Malwarebytes and Webroot require their own cleanup methods. Restart after each step.
Antivirus software embeds itself deeper into Windows than any other consumer application. It installs kernel-level drivers, registers self-protection services, and adds browser extensions — all of which survive a standard Control Panel uninstall. The result is leftover components that block new antivirus installation, confuse Windows Defender, and trigger pop-ups for months after you think the software is gone.
This guide covers complete removal for all six brands on migendeals.com — Norton, Bitdefender, McAfee, ESET, Malwarebytes, and Webroot — on Windows 10, Windows 11, and macOS.
Table of Contents
Why Windows “Uninstall” Doesn’t Fully Remove Antivirus Software
Standard Windows uninstall removes the antivirus interface but leaves behind the components that actually do the protecting — and those components are intentionally built to resist removal.
Security software registers protection components at the operating-system level, outside the reach of the standard uninstaller. Three categories of remnants survive a Control Panel uninstall for every major brand:
- Kernel-level drivers that intercept file system activity and network traffic at the OS level
- Browser extensions such as McAfee WebAdvisor and Norton Safe Web that modify search settings, homepages, and browsing behavior
- Scheduled tasks and OEM installers that silently reinstall the antivirus after reboot — most common on Dell, HP, and Lenovo machines with preinstalled McAfee or Norton
The fix is a three-step process — starting with Windows Settings, then your brand’s official removal tool, then a final cleanup of what both leave behind.
Step 1 — Remove Your Antivirus from Windows Settings or Control Panel
Start here before running any removal tool. This step removes the main program interface and frees the system to run the deeper cleanup in Step 2.
Windows 11:
- Open Settings (Win + I)
- Go to Apps → Installed apps
- Find your antivirus → click the three-dot menu → Uninstall
- Follow the uninstall prompts → Restart your PC
Windows 10:
- Open Settings → Apps → Apps & features
- Select your antivirus → click Uninstall
- Follow the prompts → Restart your PC
Control Panel alternative (Windows 10 and 11): Control Panel → Programs → Uninstall a program → select your antivirus → Uninstall → Restart.
Windows Settings uninstall removes the antivirus interface and main program files but leaves behind system services and drivers that only a dedicated removal tool can clear — which is why restarting before Step 2 is required.
Once restarted, your brand’s removal tool — covered in Step 2 — clears what Windows cannot.
Step 2 — Run Your Brand’s Official Removal Tool
Each of the six major antivirus brands provides a dedicated removal method that targets its own kernel drivers and self-protection services — components that generic third-party uninstallers cannot safely remove.
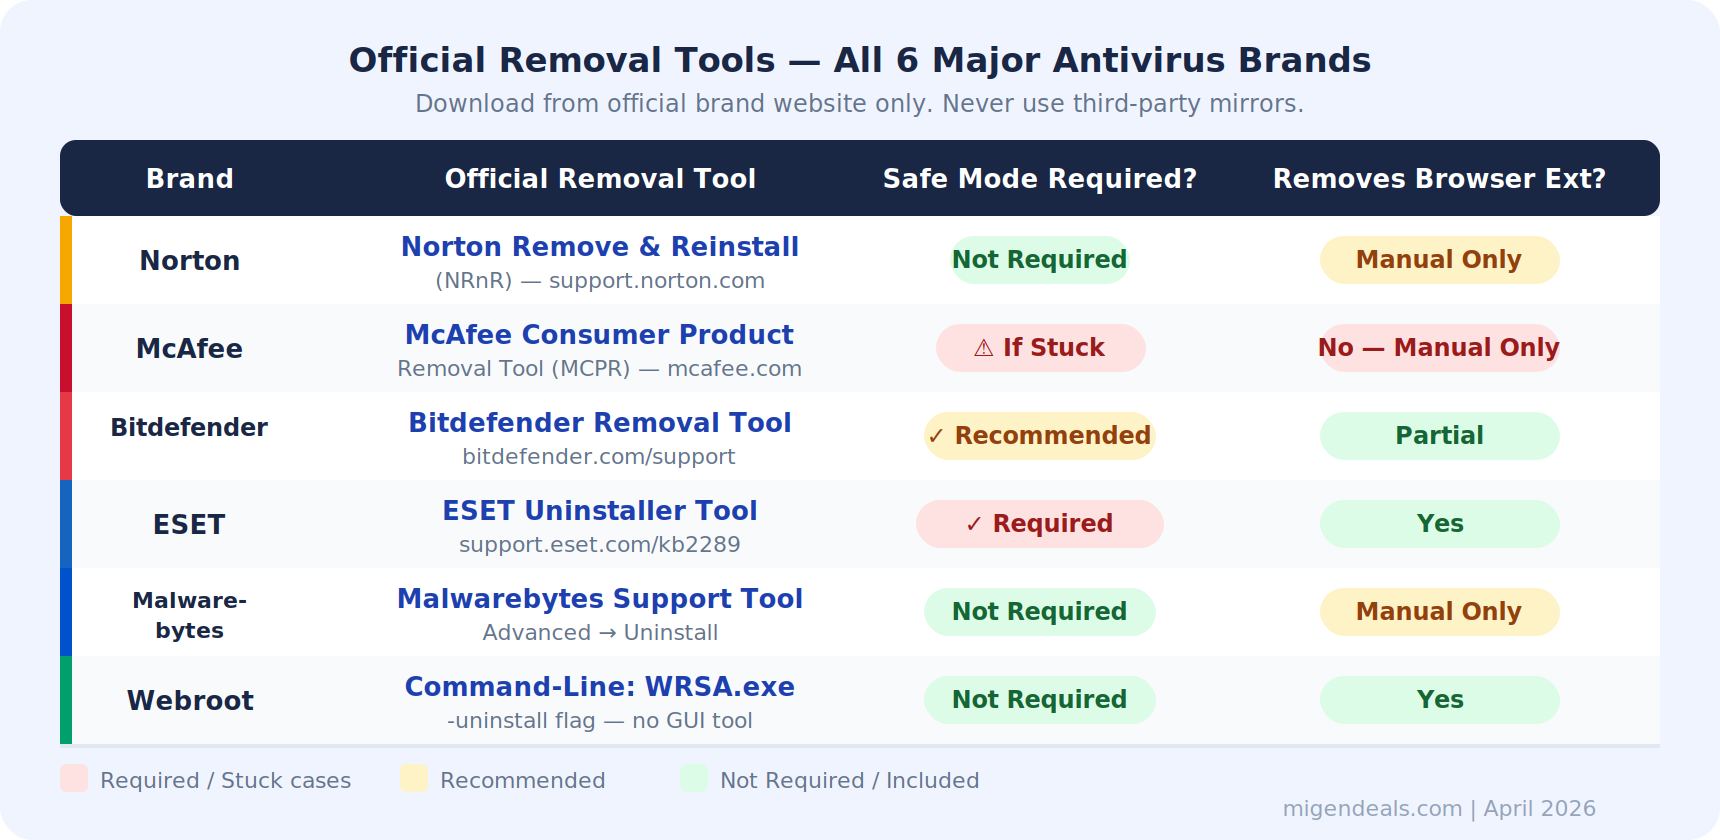
Download the tool directly from the official brand website. Never use a third-party mirror. Run it after the restart from Step 1.
Norton — Norton Remove and Reinstall Tool (NRnR)
- Download NRnR from the official Norton Remove and Reinstall page
- Close all browser windows and open programs
- Run NRnR — it removes all Norton components automatically
- When prompted to reinstall Norton, decline if you are switching to a new antivirus
Norton’s Remove and Reinstall tool deletes all Norton 360 components from Windows 10 and 11 in a single session — users switching to a new antivirus should decline the reinstall prompt at the end of the process.
OEM warning: Open Task Scheduler after running NRnR and delete any Norton-named tasks if Norton came preinstalled on your PC (Dell, HP, Lenovo) — or Norton may reappear after the next reboot.
McAfee — McAfee Consumer Product Removal Tool (MCPR)
- Download MCPR directly: download.mcafee.com/products/licensed/cust_support_patches/MCPR.exe — always download a fresh copy, as McAfee updates MCPR regularly
- Download MCPR on a second device and transfer it via USB drive if McAfee is blocking your internet connection
- Restart into Safe Mode if the standard uninstall in Step 1 failed or froze
- Run MCPR → restart when prompted
McAfee’s MCPR tool removes the core antivirus suite from Windows 10 and 11, but the McAfee WebAdvisor browser extension requires separate manual removal from each browser’s extension settings after MCPR completes.
OEM bloatware note: McAfee is the most common preinstall on Windows 11 laptops from Dell, ASUS, and Lenovo. Open Installed Apps and remove any “McAfee Security Scan Plus” or OEM installer entry first — then re-run MCPR — if McAfee reinstalls after MCPR.
Bitdefender — Bitdefender Removal Tool
- Visit the Bitdefender uninstall support page and download the Bitdefender Removal Tool from the direct link on that page
- Restart into Safe Mode (hold Shift → click Restart → Troubleshoot → Advanced options → Startup Settings → press F4)
- Run the tool in Safe Mode → restart normally when complete
Bitdefender’s official removal tool runs most effectively in Windows Safe Mode — a requirement Bitdefender’s support documentation explicitly states for complete removal of its kernel-level components.
ESET — ESET Uninstaller
- Download ESET Uninstaller (ESETUninstaller.exe) from the official ESET KB2289 page
- Restart into Safe Mode before launching — ESET Uninstaller requires Safe Mode to operate. On Windows 11: hold Shift → Restart → Troubleshoot → Advanced options → Startup Settings → F4
- In Safe Mode, run ESETUninstaller.exe → type the number for your ESET product → type y to confirm → press any key to exit → restart normally
ESET’s Uninstaller tool requires Windows Safe Mode to operate — users must restart into Safe Mode before launching it, or the tool will not remove ESET’s system-level drivers.
Windows 11 note: Move ESETUninstaller.exe from your Desktop to a folder outside OneDrive sync (such as C:\Users\[YourName]\Documents on a local profile, or C:\Temp) before running — a “file cannot be accessed” error appears when launching from a OneDrive-synced Desktop on Windows 11.
Bonus: ESET also publishes AV Remover — a separate tool that removes competing antivirus products. Switching TO ESET from another brand? AV Remover handles the previous AV’s removal automatically.
Malwarebytes — Malwarebytes Support Tool
- Follow the instructions on the official Malwarebytes uninstall guide to download the Malwarebytes Support Tool
- Open the tool → click Advanced
- Select Uninstall → the tool removes Malwarebytes in one pass
Malwarebytes Support Tool includes a dedicated Advanced Uninstall function that removes Malwarebytes Standard, Plus, and Total — including the Browser Guard integration — from Windows 10 and 11 in one pass.
Note: Malwarebytes Browser Guard is a separate browser extension. Remove it manually from Chrome, Firefox, or Edge after the Support Tool completes.
Webroot — Command-Line Uninstall
Webroot does not offer a standalone GUI removal tool — uninstallation on Windows 10 and 11 requires running WRSA.exe with the -uninstall flag from Command Prompt, a step Webroot’s support documentation confirms as the primary removal method.
Check your Windows version first:
- 64-bit Windows 10/11 (most modern PCs):
"C:\Program Files (x86)\Webroot\WRSA.exe" -uninstall - 32-bit Windows:
"C:\Program Files\Webroot\WRSA.exe" -uninstall
Steps:
- Open Command Prompt as Administrator (search “cmd” in Start → right-click → Run as administrator)
- Type the command for your Windows version above — type it manually, do NOT copy/paste (Webroot may block paste input)
- Press Enter → click Yes when prompted → Webroot removes itself and restarts automatically
Use the command-line method above if Webroot does not appear in Installed Apps — this is a documented behavior on some Windows 11 builds where Webroot’s entry does not appear in the standard app list.
Running the removal tool clears the main program — but residual files, browser extensions, and auto-restart services often remain. Step 3 covers those.
Step 3 — Delete Leftover Files, Services, and Browser Extensions
Even after the vendor removal tool runs, three categories of remnants commonly persist.
Leftover files — check these folders:
- C:\Program Files\ — look for a folder named after your antivirus brand
- C:\ProgramData\ — antivirus logs and configuration files often remain here
- C:\Users\[YourName]\AppData\Local\ and \Roaming\ — browser data and antivirus caches
Leftover services — check Task Manager:
- Open Task Manager (Ctrl + Shift + Esc) → Services tab
- Search for your brand name — no matching services should be running
- Right-click → Stop if a service appears — contact vendor support if it restarts automatically
Browser extensions — check every browser you use:
McAfee WebAdvisor and Norton Safe Web browser extensions persist after vendor tool removal and must be deleted manually from Chrome, Firefox, or Edge extension settings — these extensions are the most frequent cause of post-uninstall pop-ups. Also check for: Bitdefender TrafficLight, Norton Password Manager, and Webroot Web Threat Shield.
Final verification: Open Windows Security → Virus & threat protection — only Windows Defender should appear. Repeat Steps 1 through 3 if a third-party antivirus name still shows. The three verification checks below must all show clean before you install anything new.
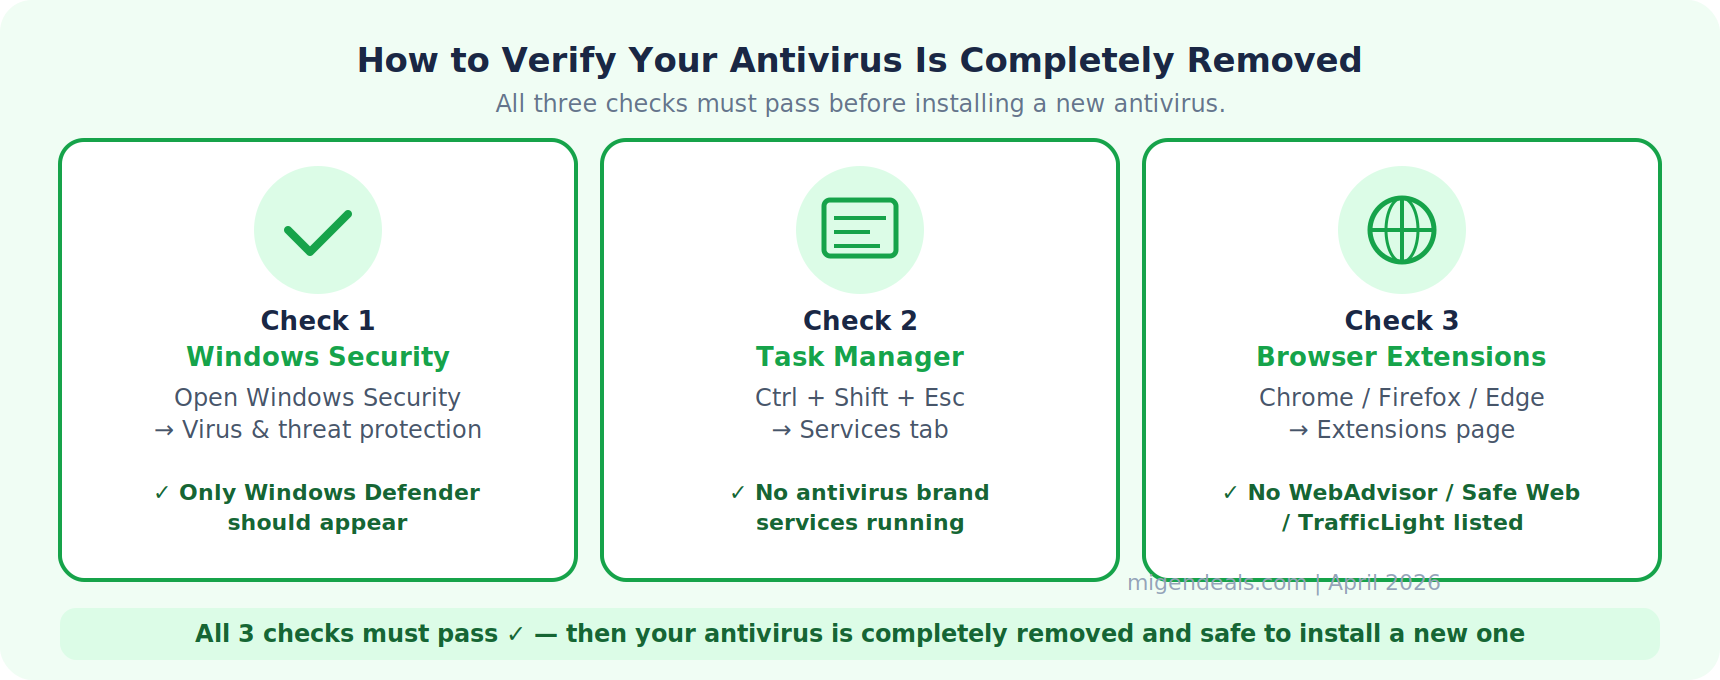
If your antivirus still won’t uninstall after Steps 1 through 3, the next section covers advanced recovery — including Safe Mode and OEM bloatware fixes.
What to Do When Your Antivirus Won’t Uninstall
A stuck uninstall almost always resolves through one of four escalating fixes — the escalation path below is shown in order of effort.
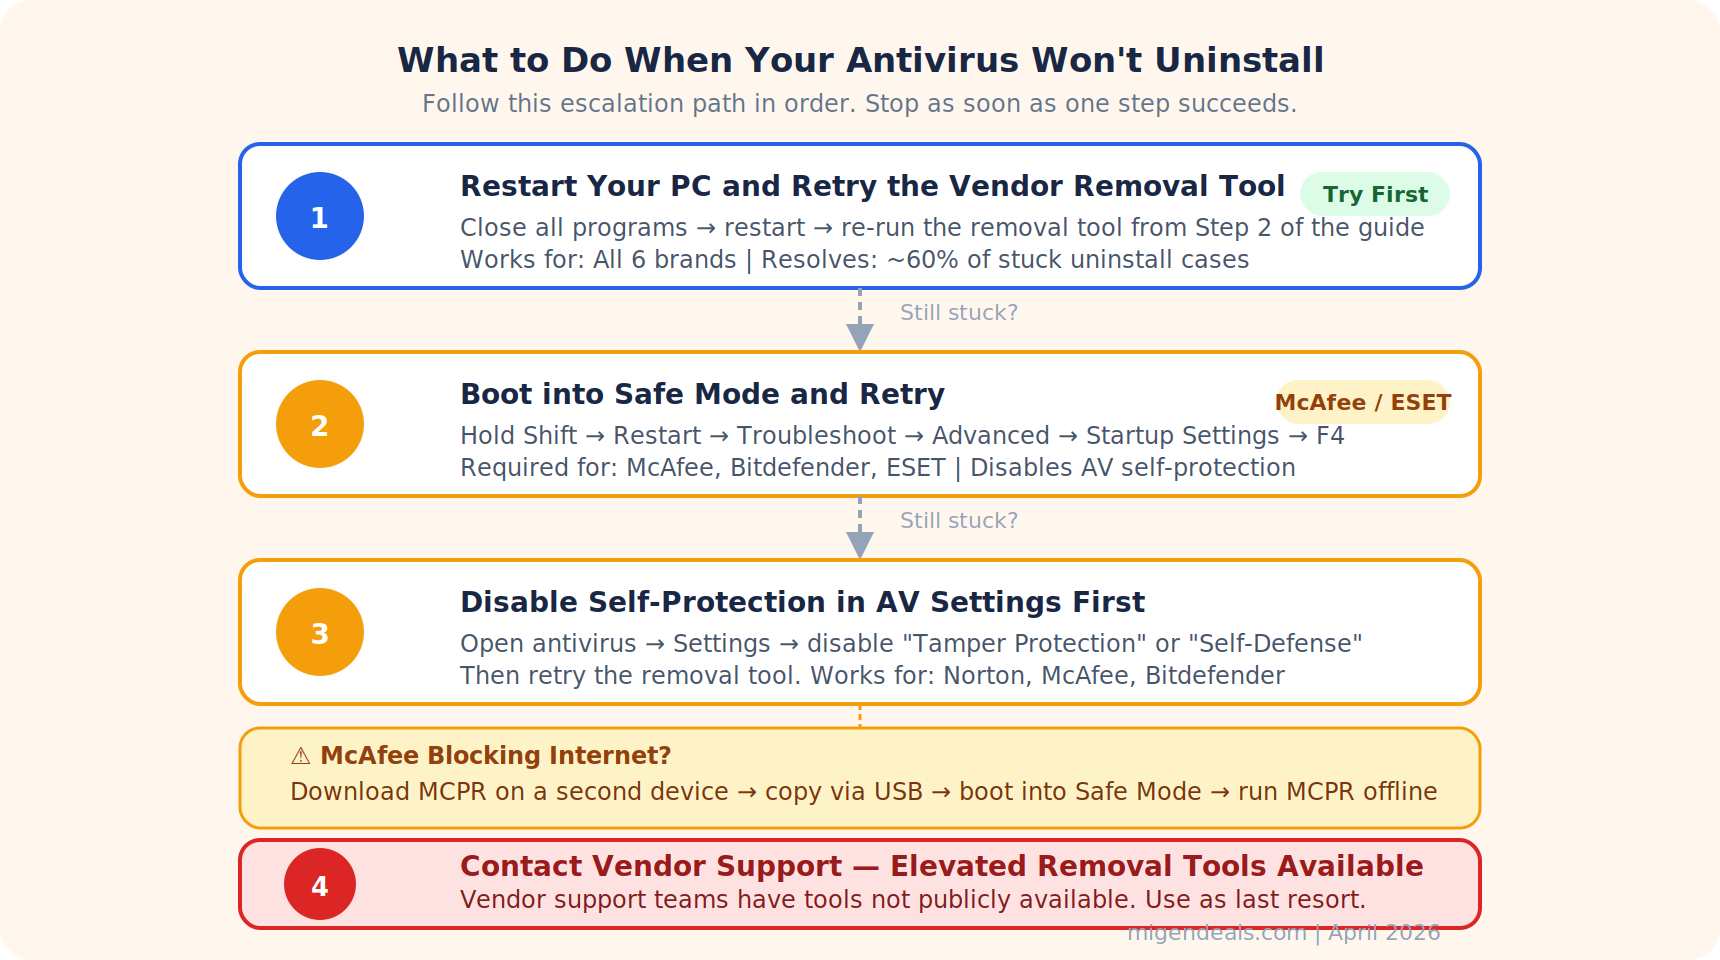
- Restart and retry. Close all programs, restart your PC, and re-run the vendor removal tool from Step 2. Many failed uninstalls resolve after a clean reboot.
- Boot into Safe Mode and retry. Safe Mode disables antivirus self-protection. Run the vendor removal tool in Safe Mode — especially important for McAfee, Bitdefender, and ESET.
- Disable self-protection in antivirus settings. Most vendors include a “Self-Protection” or “Tamper Protection” toggle in Settings — disable it before running the removal tool.
- Contact vendor support if all three steps above fail — their teams have elevated removal tools not available publicly.
Download the MCPR tool on a second device, transfer it via USB drive, restart the affected PC into Safe Mode, and run MCPR before reconnecting to the network if McAfee blocks internet access during removal.
Norton keeps reinstalling? Open Task Scheduler (search “task scheduler” in Start) and delete any task with “Norton” in its name. Also check Installed Apps for “Norton Downloader” or any OEM Norton entry and remove it before re-running NRnR.
If two antivirus products are running at the same time — rather than one stuck uninstalling — that is a conflict problem with a different solution, covered separately at the end of this guide.
Mac removal follows different rules entirely — no Safe Mode equivalent, and vendor tools work differently on macOS.
How to Completely Remove Antivirus Software on a Mac
Dragging an antivirus app to the macOS Trash does not remove its system extensions or background daemons — users must run the vendor’s Mac uninstaller or manually delete files from /Library/Application Support and /Library/LaunchAgents to complete the removal. The cleanup map below shows all three required steps.
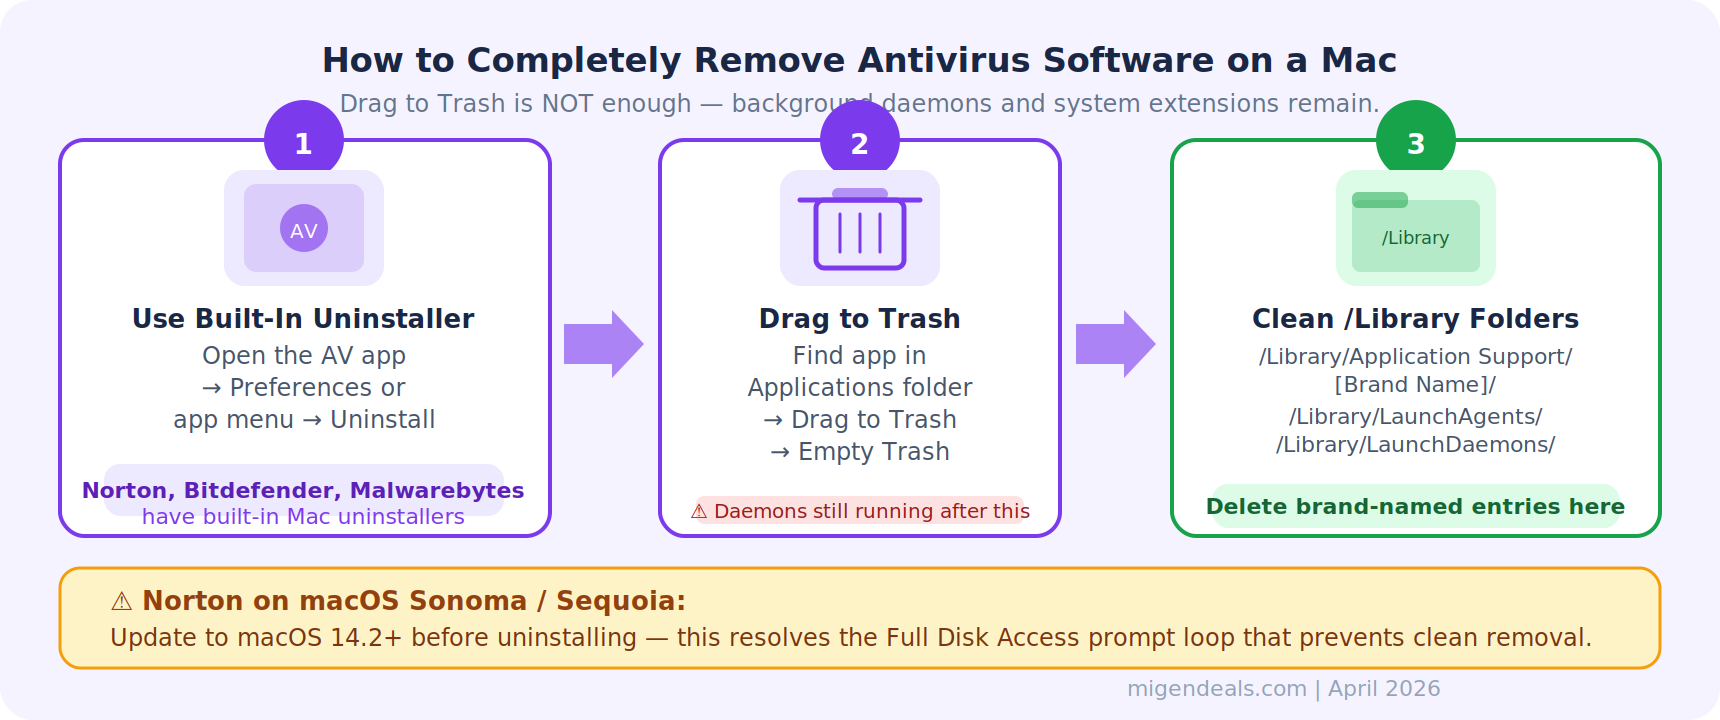
General Mac removal path (applies to all brands):
- Open the antivirus app → look for a built-in Uninstall option in the app menu or Preferences
- Drag the app to Trash → Empty Trash if no built-in uninstaller exists
- Manually delete residual files from three locations:
- /Library/Application Support/[Brand Name]/
- /Library/LaunchAgents/ — delete entries named after your antivirus
- /Library/LaunchDaemons/ — delete matching entries here as well
Brand-specific Mac notes:
- Norton: Use the RemoveNortonMacFiles tool — download and instructions at Norton’s Mac uninstall page. On macOS Sonoma: update to version 14.2 or later before beginning removal to resolve the Full Disk Access prompt loop that prevents clean uninstallation.
- Bitdefender: Has a built-in Mac uninstaller inside the app — click Bitdefender in the top-left Mac menu bar → Preferences → Uninstall Bitdefender.
- McAfee: No dedicated Mac removal tool is available. Open Finder → Applications → drag McAfee to Trash → Empty Trash → manually delete residual files from /Library/Application Support/McAfee/ and /Library/LaunchAgents/. For the latest Mac-specific guidance, see McAfee’s official support.
- ESET: Open the ESET application → click ESET in the top-left Mac menu bar → Uninstall ESET. For the most current Mac uninstall steps, see ESET’s Mac support.
- Malwarebytes: Has a built-in Mac uninstaller — open Malwarebytes → click Help in the menu bar → Uninstall Malwarebytes.
- Webroot: Open Webroot → click Webroot in the top-left Mac menu bar → Uninstall Webroot SecureAnywhere. For the most current Mac steps, see Webroot’s support page.
Two of the most common questions after uninstalling are whether you need to uninstall before installing a new antivirus, and whether your computer is now unprotected — both answered next.
Do You Have to Uninstall Your Old Antivirus Before Installing a New One?
Yes — always uninstall your existing antivirus before installing a new one.
Installing a new antivirus without removing the old one causes kernel-level conflicts between two competing security products — both intercept file system activity through their own drivers, and each treats the other’s behavior as suspicious. The new antivirus installer may fail entirely, or both products may flag each other as threats and disable core protection features.
Complete Steps 1 through 3 above before running any new antivirus installer. For a full breakdown of what happens when two antivirus programs run at the same time, see our antivirus conflicts guide.
Removing your antivirus does not leave your PC unprotected — Windows handles that automatically.
Will Uninstalling Antivirus Leave My Computer Vulnerable?
No — Windows Defender activates automatically the moment any third-party antivirus is removed.
Windows Defender activates automatically on Windows 10 and 11 when any third-party antivirus is removed, and Microsoft Defender Antivirus scored 100% Total Accuracy in SE Labs’ Endpoint Protection (Home) test for Q1 2026 — a 10-product evaluation in which Norton and McAfee earned the same top result — providing full interim protection while you select and install a replacement.
Install your new antivirus as soon as the removal process is complete. Windows Defender covers all core malware protection in the interim, but it does not include VPN, identity theft monitoring, or parental controls that paid suites provide.
When you’re ready to choose a replacement antivirus, the next section points you to the right resources.
Which Antivirus Should You Switch To After Uninstalling?
All six brands reviewed on migendeals.com offer a free trial before purchase — 7 days for Norton, 14 days for Malwarebytes and Webroot, and 30 days for Bitdefender, McAfee, and ESET — so you can test before committing to a new subscription.
For full reviews, current pricing, and the best available deals:
- Norton 360 review and deals
- Bitdefender Total Security review and deals
- Best antivirus deals — all six brands
Once you have chosen a replacement, our antivirus installation guide walks through setting up the new software cleanly.
Fully removing your current antivirus is the necessary first step. From there, every option is open.
Frequently Asked Questions
Does Uninstalling Antivirus Delete My Files?
No. Antivirus removal tools delete only the security software’s program files, services, and registry entries — personal files, documents, and downloads remain untouched throughout the removal process.
Can I Use Revo Uninstaller Instead of the Vendor Tool?
Revo Uninstaller is useful for cleaning up leftover files and registry entries after the vendor tool runs — but it should not replace the vendor tool. Vendor tools remove kernel drivers and self-protection services that Revo cannot safely reach. Use the vendor tool first, then Revo if leftover folders remain.
How Do I Know If the Uninstall Is Complete?
Run this three-step verification before installing any new antivirus:
- Open Windows Security → Virus & threat protection — only Windows Defender should appear
- Open Task Manager → Services tab — no antivirus brand services should be running
- Open each browser → Extensions — no antivirus extension should be listed
All three checks must pass before the removal is complete.
The Bottom Line on Uninstalling Antivirus Completely
Completely removing antivirus software requires two steps beyond what Windows provides: a brand-specific vendor tool and a manual cleanup of leftover browser extensions and services. All six major brands — Norton, Bitdefender, McAfee, ESET, Malwarebytes, and Webroot — publish dedicated removal methods, and each requires a different approach. ESET’s Uninstaller requires Safe Mode for complete removal; McAfee’s MCPR and Bitdefender’s Removal Tool work best in Safe Mode for stuck cases. Norton’s NRnR runs in normal mode but leaves scheduled tasks behind on OEM machines from Dell, HP, and Lenovo that must be deleted from Task Scheduler manually. McAfee and Norton are the two brands most frequently reported as reinstalling themselves after removal — both due to OEM background installers bundled with new Windows 11 laptops. After any removal, Windows Defender activates automatically — it scored 100% Total Accuracy in SE Labs’ Endpoint Protection (Home) Q1 2026 test of 10 home security products, matching Norton and McAfee’s top results. Open Windows Security after completing all three steps: the removal is complete if only Windows Defender appears under Virus & threat protection.